


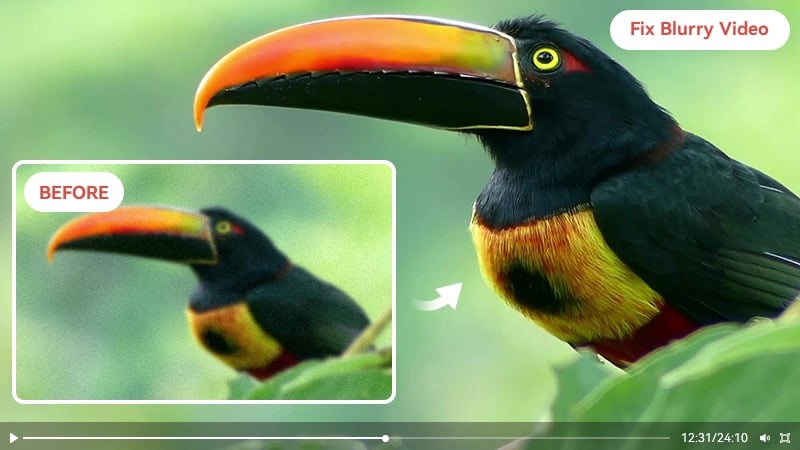
How to Fix Blurry Video to Make it Clear?
It’s very frustrating when your video has blurry spots, as it means the visual quality will be injured, whether the video you recorded with a mobile phone or the old TV shows & movies, especially when you play these videos on modern high-definition displays. How to make these blurry videos clearer? You can read this article to learn how to fix blurry videos and improve their visual quality.
 Part 1: Why Are Your Videos Blurry
To effectively fix blurry videos, it's crucial to understand the different types of blurriness that can occur. Blurriness can result from issues such as focus problems, motion blur, or compression artifacts. By identifying the root cause of blurriness in your videos, you can take targeted steps to address them.
Due to the camera shake and poor lighting, the footage you take with your phone, or the camera might end up with blurry spots. The blurry issue also happens when you zoom in or scale footage larger than what you originally recorded. The primary reason is that the original footage was recorded blurry, which is mostly due to camera shaking, high ISO, shallow depth of field, wrong focus set up, etc. There are some other factors that may contribute to the blurry footage, you can have a general idea about these factors before you go to the recording process.
Part 2: How to Fix Blurry Videos with AVCLabs Video Enhancer AI
No matter what reasons cause the blurry video, you can use third-party software to fix the blurry videos to make them clear and acquire a visually new look. You can use software like Video Enhancer AI, professional video editors like Adobe Premiere Pro, or a standalone product that allows you to deblur effortlessly.
As a dedicated video enhancement software powered by AI, AVCLabs Video Enhancer AI was born to improve the low-resolution videos (Anime episodes, movies, recordings, or home videos) to a higher degree with true details and motion consistency kept, thus you can get the best viewing experience on modern displays and bring your old videos such as blurry faces in videos a stunningly new look. AVCLabs Video Enhancer AI is your best choice to upscale the footage to 200% or 400% with the great details and best video quality enhanced, especially if your footage becomes blurry when you zoom in or scale footage larger than what you originally recorded.
To fix the blurry videos and make them look clearer, AVCLabs Video Enhancer AI is the deblurring tool that uses machine learning to deblur each frame of your footage, then recover the blurred frames. You can take a look at how to deblur with AVCLabs Video Enhancer AI.
Video Enhancer AI
- Enhance the video quality automatically.
- Upscale videos from SD to HD, HD to 4K.
- Convert video to 60, 90 and even 120 FPS.
- Sharpen faces from blurry video.
- Colorize B&W videos to make revive again.
- Support GPU & TensorRT acceleration.

Launch AVCLabs Video Enhancer AI
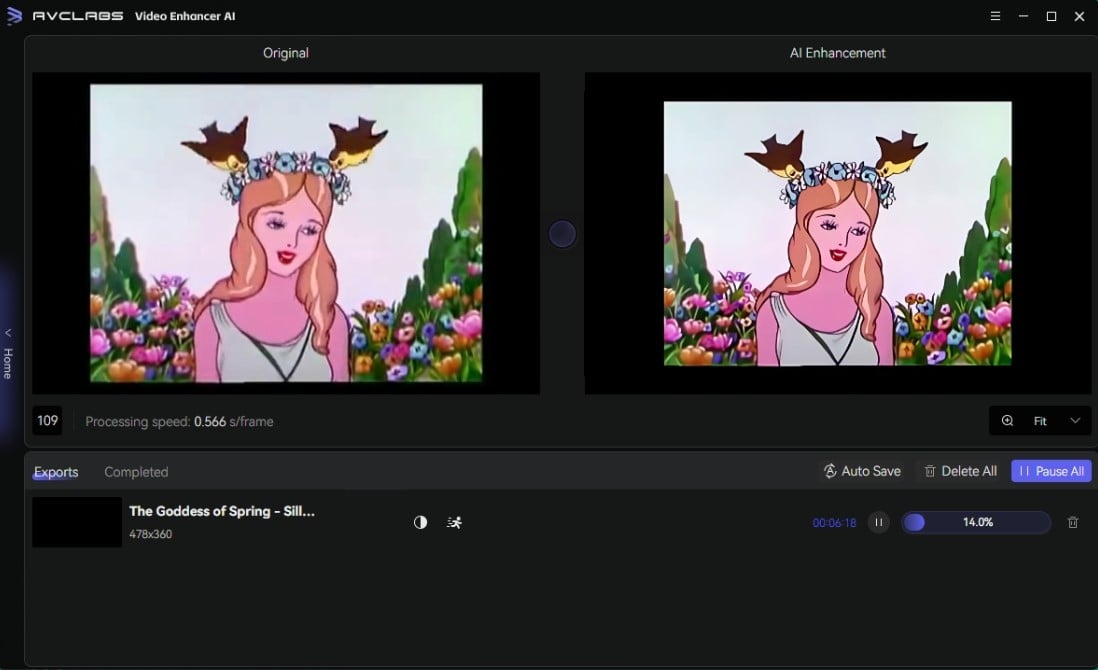
Download the installation package of AVCLabs Video Enhancer AI and install it on Windows PC. Launch AVCLabs Video Enhancer AI and you will enter the main window of AVCLabs Video Enhancer AI shown below.
Import Video
Click the "Browse" button in the middle of the application to open a file pop-up window and select a video file.
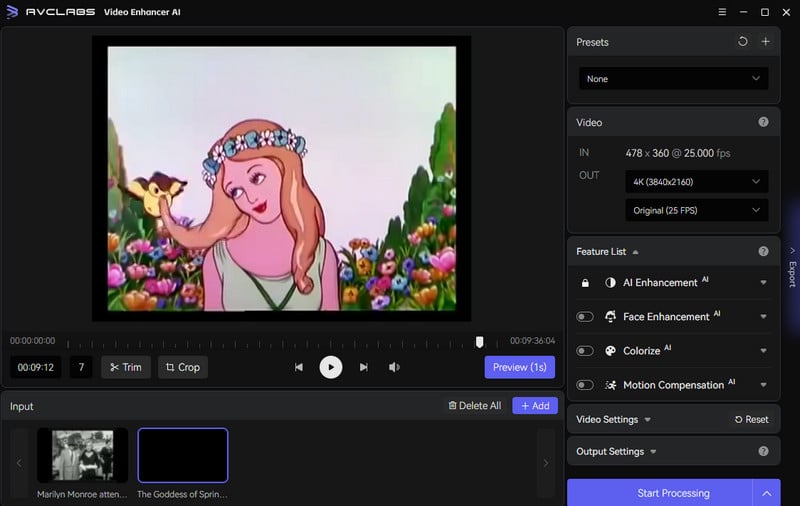
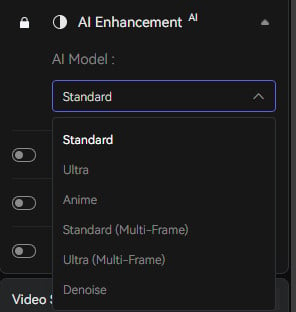
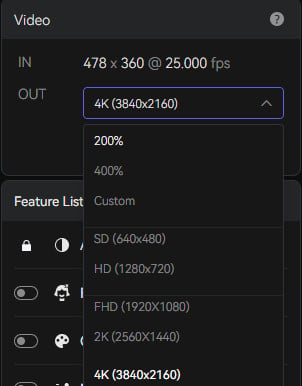
Select the AI Model
Just turn on AI Enhancement and select the AI Model. Then unfold the output options and adjust the output to SD, HD, 4K UHD, 4K, and 8K. Leave the output FPS to the default if you don't need to change it.
You can also go to Video Settings and Output Settings menu to adjust other parameters such as video brightness, contrast, output format, etc. The program also allows you to trim or crop the video before processing.
Start Converting Video
Click the "Export" button to render your video. The program will Export frames of your source video and assembling the upscaled video. After the conversion completed, you can click the "Open Folder" button to check the output video.
During processing, you can click the Home button in the left middle to return to the main interface, where you can continue adding videos to the program for processing.
Video Tutorial: Revive Your Blurry Videos with the Power of AI
Part 3: How to Fix Blurry Videos Online
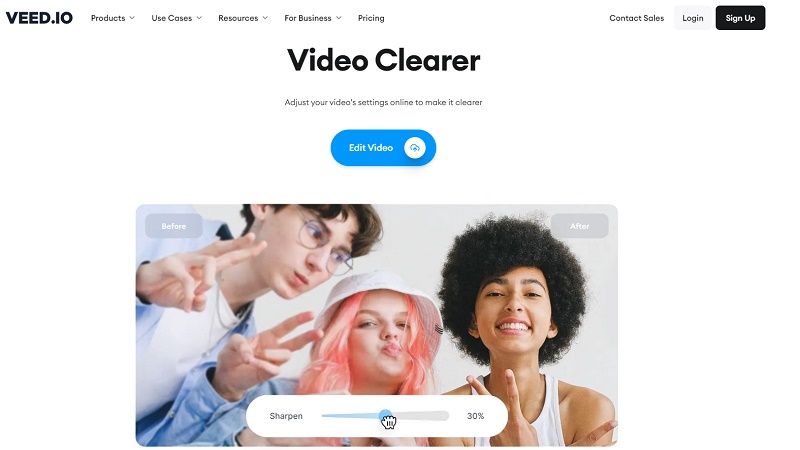
Not everyone has access to video enhancement software. Fortunately, there are online tools available that can help improve the quality of your videos. When it comes to fixing blurry videos online, one popular tool that can be used is VEED Video Clearer. VEED Video Clearer is an online tool that allows users to enhance the quality of their videos and make them clearer. It offers features such as adjusting the contrast and increasing the brightness level to reduce blurriness in videos.
Let's follow the steps below to fix blurry videos online with VEED Video Clearer.
Upload A Blurry Video
Please visit the VEED Video Clearer website and click the Edit Video button.
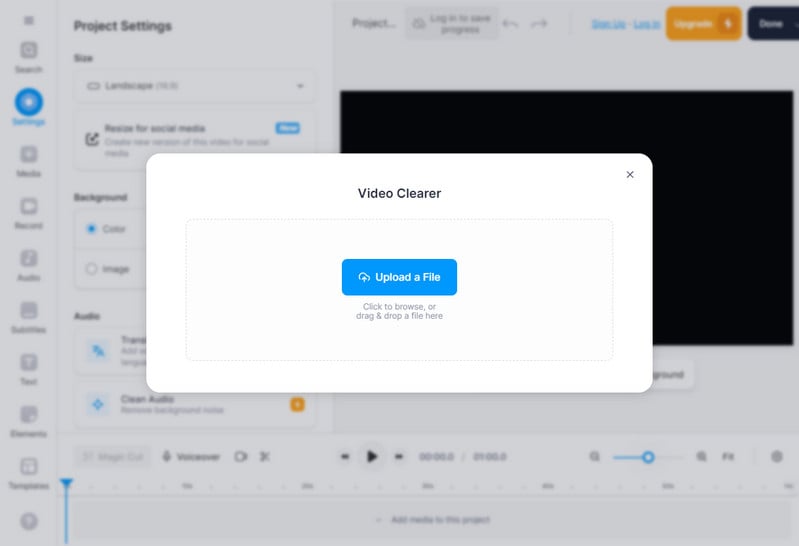
You can directly drag and drop a blurry video to it or hit the Upload a File button to add a video.
Adjust Video Settings
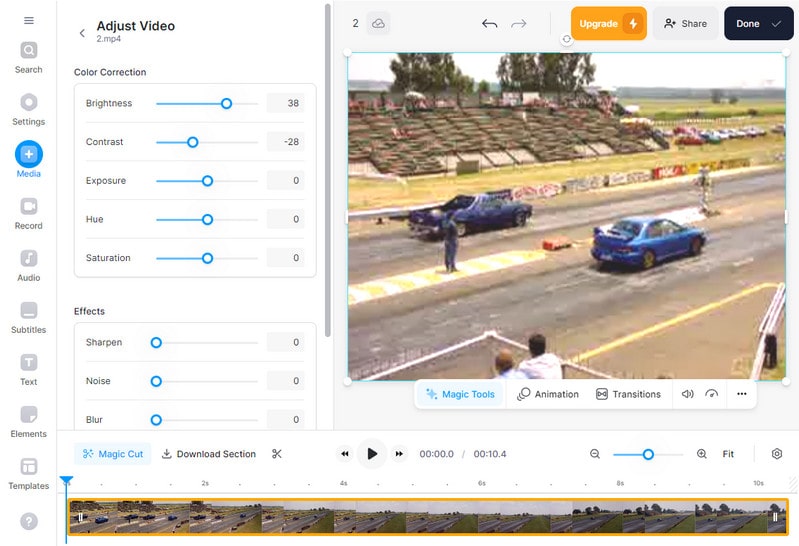
After uploading your blurry clip, click on your video on the timeline and then press the Adjust button beside the Settings option, you will be presented with various options to enhance your video. These options include adjusting brightness, saturation, contrast, hue and more. For minimizing blurriness, it is recommended to increase the brightness level and slightly decrease the contrast. While this may not entirely fix severe focus issues, it will certainly improve the overall quality.
Export the Clear Video
Once you are satisfied with your adjustments, click the Export Video button to download the video to your computer.
Part 4: Additional Tips for Clear Video Capture
While it's important to fix blurry videos in post-production, taking preventive measures during the video capture process can also make a significant difference.
By implementing these additional tips for clear video capture, you can ensure that your footage is sharp, detailed, and visually appealing. Remember to experiment and practice to find the techniques that work best for your specific shooting scenarios.
1. Lighting is Key
Ensure that your subject is well-lit. Good lighting helps to eliminate shadows and provides better clarity in your video footage. If shooting indoors, utilize natural light from windows or invest in artificial lighting equipment for a professional look.
2. Adjust Camera Settings
Take the time to adjust your camera settings before shooting. This includes setting the appropriate white balance, exposure, and ISO levels. Experiment with different settings to achieve the desired look and ensure optimal clarity.
3. Use Manual Focus
While autofocus can be handy, it's not always accurate. Switching to manual focus allows you to have more control over what parts of the frame are sharp and ensures that the subject remains in focus throughout the video.
4. Avoid Digital Zoom
Digital zoom can degrade the quality of your video, resulting in pixelation and loss of detail. If you need to get closer to your subject, physically move closer or use optical zoom if your camera has that capability.
5. Keep the Camera Steady
Shaky footage can lead to blurry videos. Invest in a stable tripod or use a stabilizer to keep your camera steady during filming. This will result in smoother footage and sharper details.
6. Shoot in High Resolution
Whenever possible, shoot in the highest resolution available on your camera. Higher resolutions provide more detail and allow for better flexibility during post-production editing.
7. Clean the Lens
Before shooting, make sure to clean your camera lens thoroughly. Dust, fingerprints, or smudges can impact the clarity of your footage. Use a microfiber cloth or lens cleaning solution for a clear lens.
8. Minimize Background Distractions
Pay attention to the background of your shot. Cluttered or distracting backgrounds can draw attention away from the subject and impact the overall quality of the video. Opt for simple and clean backgrounds whenever possible.
9. Plan Camera Movements
If you plan to incorporate camera movements in your video, practice and rehearse them beforehand. Smooth, controlled camera movements result in clearer footage and a professional look.
10. Keep the Camera Cool
Overheating can lead to reduced image quality and potential damage to your camera. Avoid shooting in direct sunlight for extended periods and use external cooling mechanisms if necessary.
Conclusion:
In conclusion, there are many different ways to help fix those blurry videos. Depending on the quality of the video and individual needs, you can experiment with using software such as AVCLabs Video Enhancer AI or VEED Video Clearer. Additionally, keep in mind other methods such as optimizing settings on your cameras, being aware of lighting conditions and double-checking sharpness after editings for sharper images. With these useful tips and tricks, you can say goodbye to blurry videos forever! So why not get started creating stunning videos today with perfect clarity that will have people talking about your content for years to come? Take your video production game to the next level, call out your vision like a pro!
Try AVCLabs Video Enhancer AI to fix your blurry footage.


Annie Janice | Content Writer
Over 10 years tech article writing experience in IT solutions, Annie Janice is familiar with all kinds of video editor and enhancement software on the market. She is good at providing professional and effective video editing, converting and enhancement tips, helping users to solve the problems in video creation.
Related Articles & Tips
- • AVCLabs Video Enhancer AI Crack 2026 [Free Download]
- • Top 10 Video Stabilizer Apps to Stabilize Shaky Video
- • Change Video Quality: Methods and Considerations
- • How to Fix The Quality of A Video
- • Solved! Full Guide on How to Fix Blurry Videos Sent to Me
- • How to Convert Video to 60FPS for Free in 3 Totally Different Ways
 AI Products


Hero Products


Video Converter
- MP4 Converters
- MKV to MP4 Converters
- AVI To MP4 Converters
- MOV to MP4 Converter
- Best Free AV1 Converters
- HEVC/H.265 Converter
- H.264 Video Converter
- Android Video Converter
- Samsung Video Converter
- Sony PS4 Video Converter
- Nokia Video Converter
- MPEG Video Converter
- Convert 4K to 1080P
- Convert MP4 to MP3
- Convert M2TS to MP4
- Convert MVI to MP4
- Convert WebM to MP4
- Convert Videos to MP3
- Convert MP4 to 3GP
- Convert M4V to MP4
DVD Converter
Video Editor
- Best AI Video Editors
- Free AI Video Generators
- Best AI Slideshow Makers
- Replace Face in Video
- AI Cartoon Video Generators
- Text-to-Video AI Generators
- Best Free Voice Changers
- Text-to-Video AI Generators
- Sites to Download Subtitles
- Add Subtitles to Video
- Free Online Video Compressor
- Convert Your Videos to GIFs
- Blur Video Backgrounds
- Video Editing Apps for YouTube
Video Enhancer
- Best 10 Video Enhancer
- Improve Video Quality
- Fix Blurry Videos
- Remove Noise from Footage
- Upscale Video from HD to 4K
- Upscale Video from 480P to 1080P
- Best AI Video Upscaling Tools
- Make a Blurry Video Clear
- Best Old Video Restorer
- How to Sharpen Video
- Fix Bad Quality Videos
- Increase Video Resolution
- Convert Videos to 4K
- Upscale Anime Videos to 4K
Photo Enhancer
- Fix Blurry Pictures Online
- Make Blurrys Picture Clear
- Increase Image Resolution Online
- Remove Blur from Images
- AI Image Sharpener Online
- Topaz Gigapixel AI Alternatives
- Fix Low-resolution Photos
- Colorize Historical Photos
- Remove Noise from Photos
- AI Image Sharpener
- AI Face Retoucher
- AI Image Enlargers
Mobile & PC
